Introduction
The after-school rush is when real backpacks hit the floor, shoes go flying, and suddenly every kid in the house is absolutely certain they have not eaten in three days. Instead of reaching for the same old bag of chips or box of crackers, this list gives you thirteen genuinely fun, easy-to-make snack recipes that kids will actually get excited about. Most of these come together in under 20 minutes, use ingredients you already have, and are just hands-on enough to make snack time feel like an event rather than an afterthought.
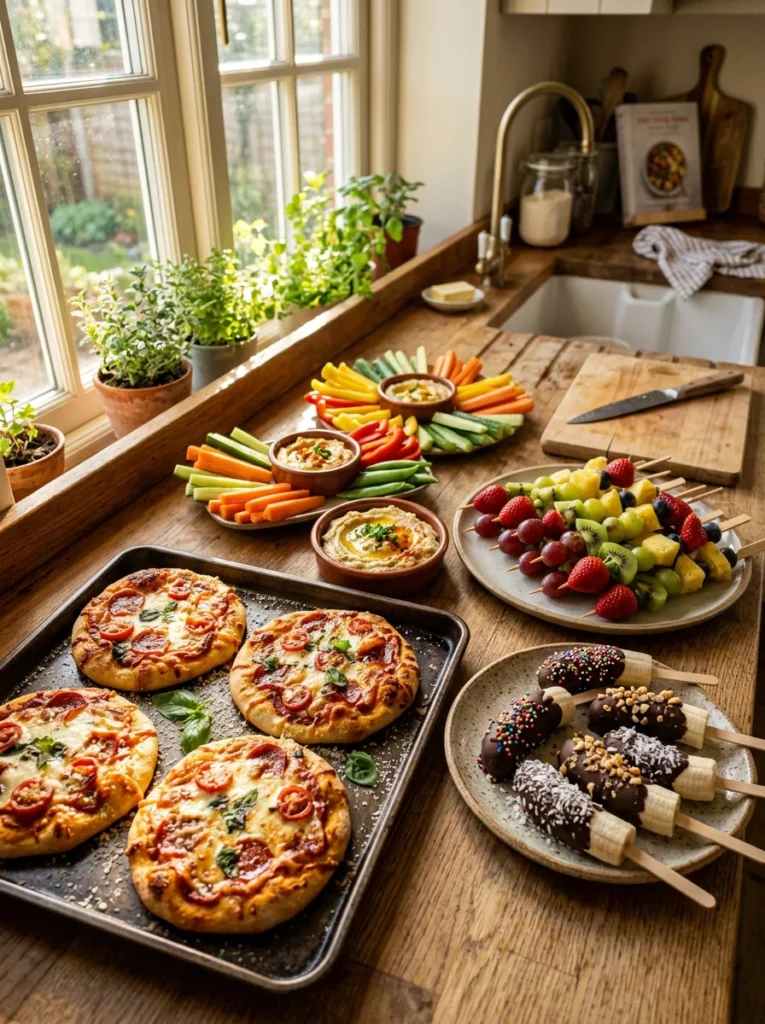
1. Pizza Bagel Bites

Pizza bagel bites are the ultimate after-school snack because they deliver everything kids crave in a hot, melty snack the tang of tomato sauce, the pull of gooey mozzarella, and the slight chew of a toasted bagel without requiring any dough-making, long prep, or complicated technique whatsoever. You can have these in the oven in under five minutes and on the table in fifteen, which makes them as practical for you as they are exciting for your kids. The individual portions are also a brilliant feature: every child gets their own set of bites, which sidesteps the argument over who got the bigger piece that seems to accompany every shared snack. They are endlessly customizable, let each kid choose their own toppings and they become even more invested in eating them. Make a double tray and you will have teenagers willingly appearing in the kitchen, which might be the greatest miracle this recipe can offer.
Ingredients
- 4 plain mini bagels, halved (8 halves total)
- ½ cup store-bought pizza or marinara sauce
- 1 cup shredded mozzarella cheese
- 20 mini pepperoni slices
- ½ teaspoon dried oregano
- ½ teaspoon garlic powder
- Optional toppings: sliced olives, diced bell peppers, mushrooms
Instructions
- Preheat the oven to 400°F (200°C). Line a baking sheet with parchment paper.
- Place bagel halves cut-side up on the prepared baking sheet.
- Spoon about 1 tablespoon of pizza sauce onto each bagel half and spread to the edges.
- Sprinkle shredded mozzarella generously over each one.
- Arrange pepperoni slices and any additional toppings on top.
- Dust lightly with dried oregano and garlic powder.
- Bake for 10–12 minutes until the cheese is fully melted and beginning to bubble and brown at the edges.
- Cool for 2 minutes before serving. The sauce holds heat and can burn little mouths straight from the oven.
How to Serve It
Set out a small bowl of warm marinara sauce on the side for extra dipping. Kids love a sauce they can drag their bites through. Arrange the bagel bites on a wooden board alongside a handful of cherry tomatoes and cucumber slices to round out the snack into something more filling. In autumn and winter, add a sprinkle of red chili flakes for older kids who enjoy a little heat. For birthday parties or weekend snack spreads, set up a topping bar before baking and let kids customize their own. The activity keeps them busy while the oven does the work.
2. Ants on a Log (Classic and Remix Versions)
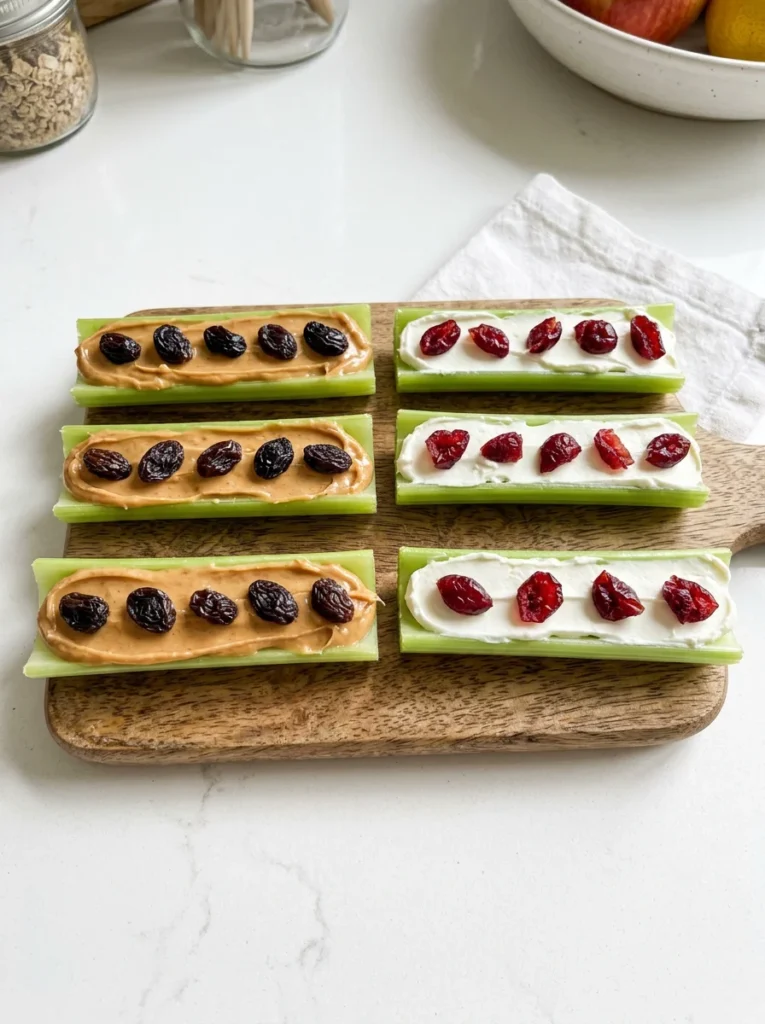
Ants on a Log has been a classic after-school snack for generations, and it remains on the list for one simple reason: it works the combination of crunchy celery, creamy filling, and sweet little toppings is genuinely satisfying to eat, and the whimsical name alone is enough to make younger kids giggle and reach for it immediately. What makes this version extra appealing is the remix approach, offering the traditional peanut butter-and-raisin alongside a cream cheese-and-cranberry variation that kids who are not peanut butter fans will love just as much. Each version takes about two minutes to assemble, requires no cooking whatsoever, and delivers a real balance of fiber, protein, and natural sweetness that keeps kids fueled through homework time without a sugar crash on the other side. The side-by-side presentation on a board makes snack time feel like a small adventure in choosing your own combination.
Ingredients
- 6 large celery stalks, washed and trimmed
- ½ cup creamy peanut butter (for classic version)
- ½ cup whipped cream cheese (for remix version)
- 3 tablespoons raisins (for classic version)
- 3 tablespoons dried cranberries (for remix version)
- Optional: mini chocolate chips, sunflower seeds, or honey drizzle
Instructions
- Trim both ends off each celery stalk and cut each stalk into 3 equal sections.
- Pat the celery pieces dry with a paper towel so the filling grips better.
- For classic logs: fill the channel of each celery piece with peanut butter using a butter knife or small spoon.
- Press raisins along the peanut butter in a single line.
- For remix logs: fill celery with cream cheese and press dried cranberries along the top.
- Arrange both versions on a board or plate side by side.
- Add optional mini chocolate chips or a light drizzle of honey if desired and serve immediately.
How to Serve It
Let kids pick their favorite version or challenge them to try both and decide which they prefer, which turns snack time into a mini taste test. Add a small side of apple slices to round out the plate and provide extra sweetness alongside the savory celery. During the holidays, use dried cranberries and green-tinted cream cheese for a festive red-and-green color combination that kids find exciting and seasonal. For school-safe households, swap peanut butter for sunflower seed butter. The flavor is remarkably similar and the snack works just as well in every way.
3. Banana Chocolate Chip Muffins
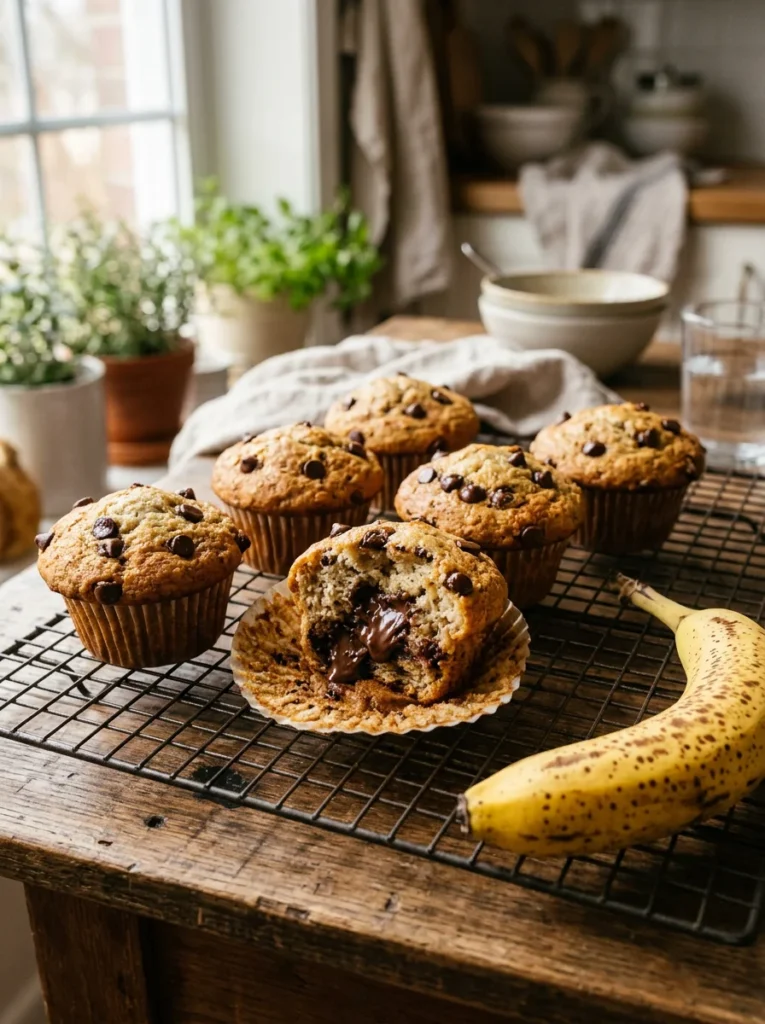
Banana chocolate chip muffins are exactly the kind of after-school snack that makes the whole house smell incredible the moment they go into the oven and that smell alone is enough to bring kids wandering into the kitchen with curious faces and suddenly very helpful attitudes. These muffins use overripe bananas, which are sweeter and more intensely flavored than fresh ones, so the natural sweetness does a lot of the heavy lifting and you do not need a mountain of added sugar to make them taste like a treat. The chocolate chips throughout make every bite feel special and indulgent, while the banana and whole egg provide enough protein and natural fiber to make this a snack that actually sustains hungry kids through an afternoon of homework and activity. They freeze beautifully, which means you can make a batch on the weekend and pull one or two out each day through the week without any effort at all.
Ingredients
- 3 very ripe bananas (the more spotted, the better)
- ⅓ cup melted butter or neutral oil
- ¾ cup granulated sugar
- 1 large egg, beaten
- 1 teaspoon vanilla extract
- 1 teaspoon baking soda
- Pinch of salt
- 1½ cups all-purpose flour
- ¾ cup semi-sweet chocolate chips, plus extra for topping
Instructions
- Preheat the oven to 350°F (175°C). Line a 12-cup muffin tin with paper liners.
- In a large bowl, mash the bananas thoroughly with a fork until very smooth.
- Stir in melted butter, sugar, beaten egg, and vanilla until well combined.
- Add baking soda and salt and stir through.
- Fold in the flour gently until just combined, do not overmix or the muffins will be tough.
- Fold in chocolate chips, saving a small handful for topping.
- Divide batter evenly among the muffin cups, filling about ¾ full.
- Press a few extra chocolate chips onto the top of each muffin.
- Bake for 18–22 minutes until a toothpick inserted in the center comes out clean.
- Cool in the tin for 5 minutes, then transfer to a wire rack.
How to Serve It
Serve warm so the chocolate chips are still slightly melted inside. This is genuinely the best way to eat them and kids absolutely love the experience of a muffin where the chocolate is soft and gooey. A small smear of butter on the cut face of a split muffin adds richness that makes it feel even more special as an after-school treat. In autumn, add ½ teaspoon of cinnamon and a pinch of nutmeg to the batter for a warmer, spiced version that pairs beautifully with a mug of warm milk. Store in an airtight container at room temperature for three days, or freeze individually wrapped for up to two months.
4. Cheese Quesadilla Triangles
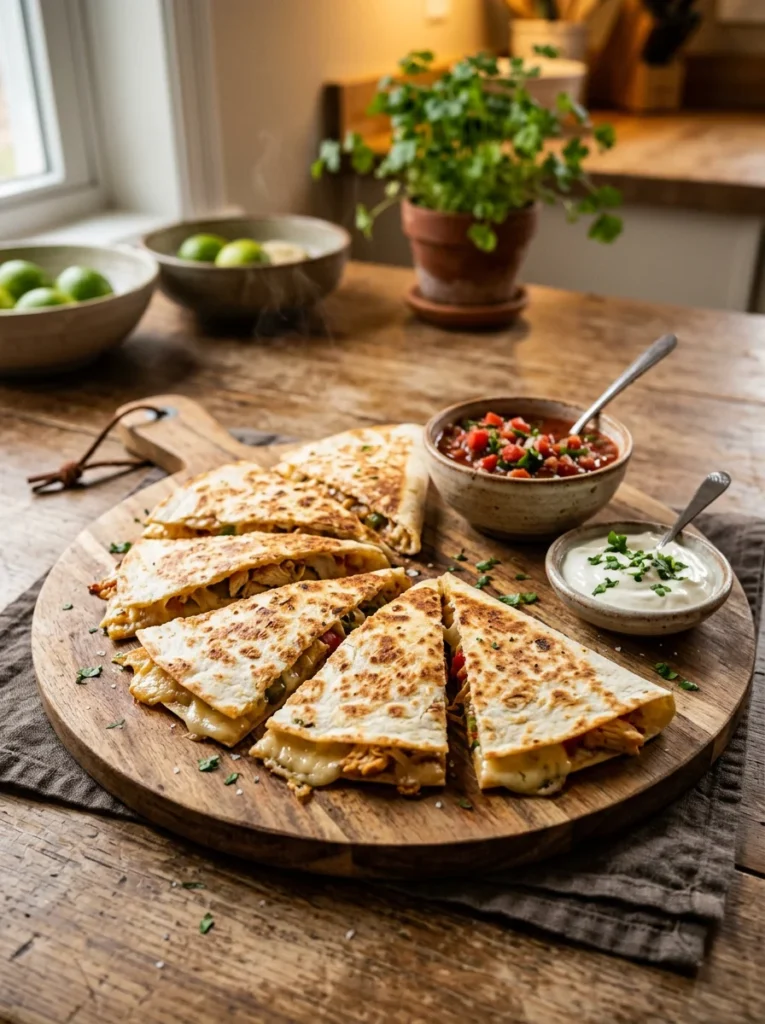
Cheese quesadillas might be the most reliably successful snack in the entire after-school repertoire. Every child, from toddlers to teenagers, accepts a warm, crispy, cheese-filled quesadilla without complaint, which is not something that can be said about very many foods. This version keeps things simple: a flour tortilla, good melting cheese, and a hot pan are all you truly need, and the whole thing is ready in under eight minutes from start to finish. What makes quesadillas special as a snack (rather than just a lazy dinner) is how well they cut into triangles that kids can pick up and eat while still warm, and how perfectly those triangles dip into salsa, sour cream, or guacamole. Add a spoonful of black beans or a handful of diced rotisserie chicken and you have a snack that crosses confidently into proper fuel territory without requiring anything more complicated than ten minutes and a non-stick pan.
Ingredients
- 2 large flour tortillas (10-inch)
- 1½ cups shredded Mexican blend or cheddar cheese
- 1 tablespoon butter or cooking spray
- Optional fillings: ¼ cup black beans, ¼ cup corn, 2 tablespoons diced green onion
- Salsa, sour cream, or guacamole for serving
Instructions
- Heat a large non-stick skillet or griddle pan over medium heat.
- Add butter or spray with cooking spray and let it coat the pan.
- Place one tortilla flat in the pan.
- Sprinkle cheese evenly over the entire surface of the tortilla.
- Add any optional fillings scattered evenly over the cheese.
- Place the second tortilla on top and press down gently.
- Cook for 2–3 minutes until the bottom is golden and crisp.
- Carefully flip using a wide spatula and cook the other side for another 2–3 minutes.
- Slide onto a cutting board and rest for 1 minute before cutting into 6 triangles with a pizza cutter or sharp knife.
How to Serve It
Fan the triangles out on a wooden board or large plate for an inviting presentation that makes even a basic snack feel like something special. Set out individual small bowls of salsa, sour cream, and guacamole and let kids choose their own dipping combination. For a more filling variation, add sliced avocado and a sprinkle of lime juice inside the quesadilla before cooking. In summer, serve alongside a light mango or pineapple salsa for a tropical twist that freshens up the flavors and adds a bright, colorful element to the plate.
5. Fruit and Yogurt Dip Skewers
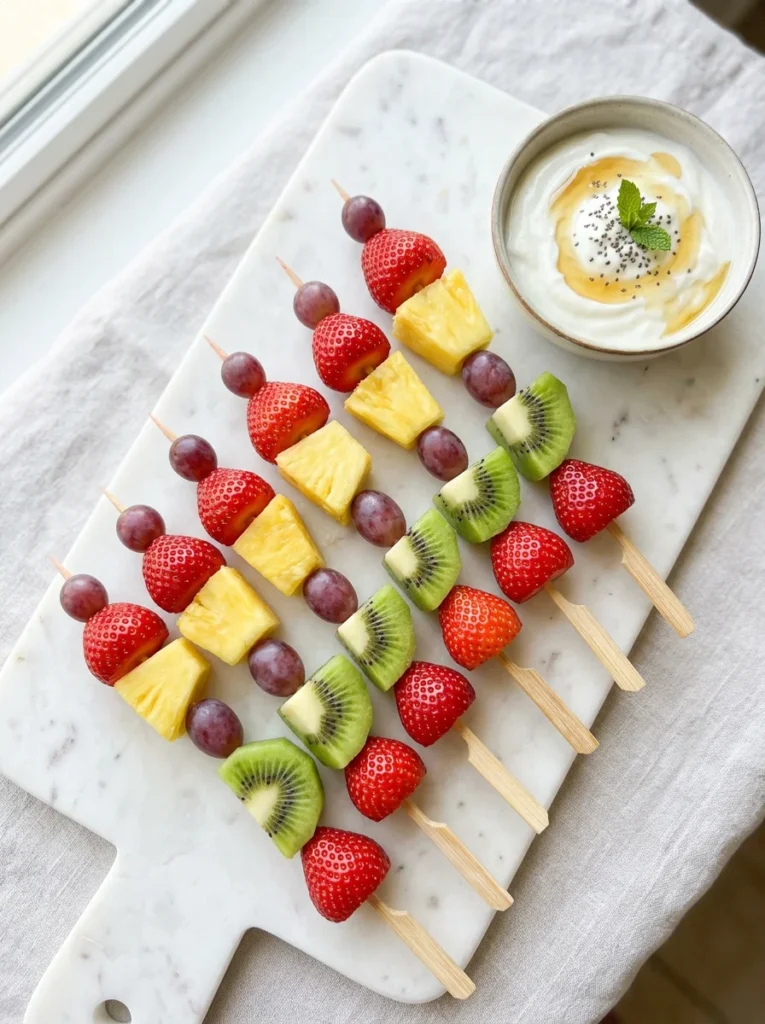
Fruit skewers with a yogurt dip are one of those brilliantly simple snacks that look far more impressive than they are to make, and that feature alone makes them a win for busy parents who want to hand their kid something that feels fun and special without spending more than ten minutes on it. Threading fruit onto a skewer transforms a basic bowl of mixed fruit into something a child will actually be excited to eat. There is something inherently appealing to kids about food on a stick, and the act of sliding pieces off as they eat adds a small interactive element that makes the whole snack more engaging. The honey yogurt dip is creamy, lightly sweet, and pairs beautifully with almost any fruit combination, and it adds a protein component that keeps kids satisfied well past the initial snack. Make these on a Sunday afternoon together with your kids and it becomes a fun activity rather than just a chore.
Ingredients
- 1 cup strawberries, hulled and halved
- 1 cup pineapple chunks
- 2 kiwis, peeled and sliced into quarters
- 1 cup red or green grapes
- 1 cup blueberries
- For the yogurt dip:
- 1 cup full-fat vanilla Greek yogurt
- 2 tablespoons honey
- ½ teaspoon vanilla extract
- Pinch of cinnamon
- 12 wooden skewers
Instructions
- Wash and prepare all fruit, cutting larger pieces into bite-sized chunks of roughly equal size.
- Threading the fruit onto each skewer in any color pattern alternating colors makes the prettiest result.
- Aim for 4–5 pieces per skewer for a good snack-sized portion.
- In a small bowl, whisk together the Greek yogurt, honey, vanilla extract, and cinnamon until smooth.
- Taste and add a little more honey if your child prefers a sweeter dip.
- Arrange completed skewers on a serving board or plate.
- Place the yogurt dip bowl alongside and serve immediately, or refrigerate for up to 2 hours before serving.
How to Serve It
Use a rainbow color arrangement on the skewers red strawberry, orange mango, yellow pineapple, green kiwi, blue blueberry and lay them across a white marble board for a presentation that looks genuinely beautiful and gets kids immediately excited. For younger children, skip the skewers entirely and arrange the fruit in a rainbow arc directly on the plate with the dip bowl at the end with the same visual impact, zero sharp stick concern. In winter months, swap fresh tropical fruits for seasonal options like mandarin segments, pomegranate seeds, and sliced pears for a more seasonal version that still hits every color and flavor note.
6. Homemade Cinnamon Sugar Soft Pretzels
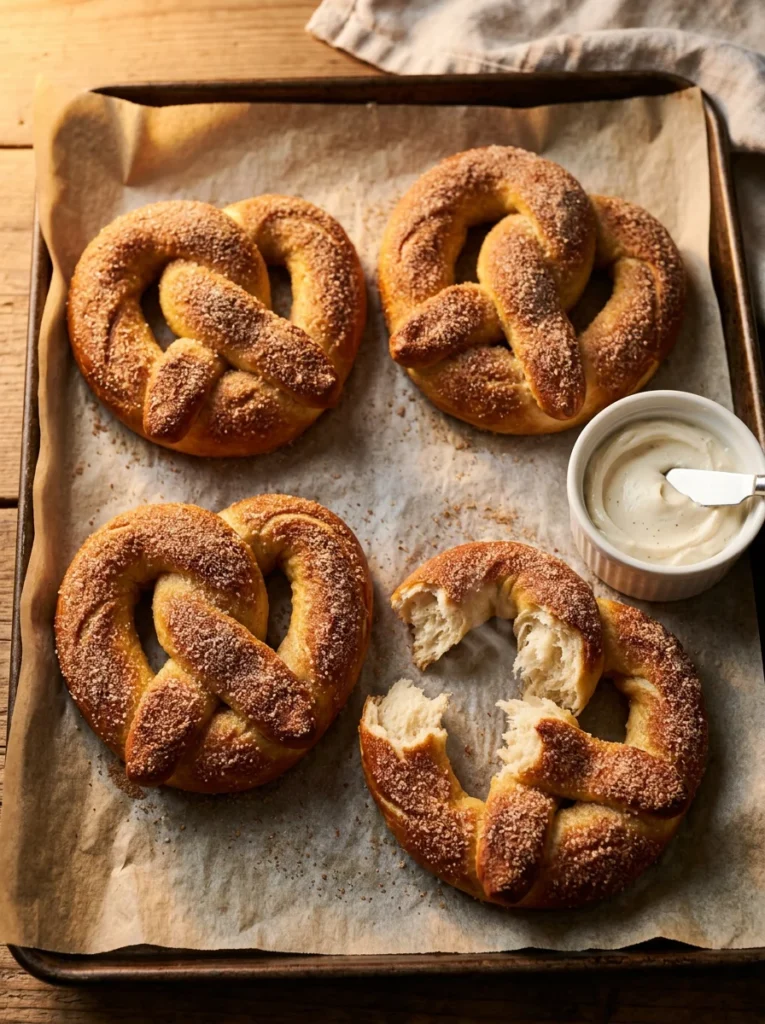
Homemade soft pretzels have a kind of magic to them the way the dough puffs in the oven, the deep golden color they develop, the satisfying chew when you pull one apart and the cinnamon sugar version takes all of that and adds a sweet, warm coating that makes each bite taste like something you would happily pay for at a mall food court. The process is more approachable than it sounds, especially using a shortcut dough that skips the long fermentation of traditional recipes, and the baking soda bath that gives soft pretzels their characteristic chewy exterior and deep color is a step that kids find absolutely fascinating to watch and help with. These take about 40 minutes from start to finish, which is long enough to feel like a proper after-school project but short enough that nobody loses enthusiasm before the pretzels hit the table. The smell that fills the house while they bake is worth making them for on its own.
Ingredients
- 1½ cups warm water (110°F / 43°C)
- 2¼ teaspoons active dry yeast (1 packet)
- 1 teaspoon salt
- 1 tablespoon granulated sugar
- 4 cups all-purpose flour
- 2 tablespoons melted butter
- For the baking soda bath:
- 8 cups water
- ½ cup baking soda
- For the coating:
- 4 tablespoons melted butter
- ½ cup granulated sugar
- 2 teaspoons ground cinnamon
Instructions
- Combine warm water, yeast, and sugar in a large bowl. Let sit for 5 minutes until foamy.
- Add salt, melted butter, and flour. Mix until a dough forms, then knead for 5 minutes until smooth.
- Cover with a damp towel and rest for 15 minutes. The dough does not need a long rise.
- Preheat the oven to 450°F (230°C). Line two baking sheets with parchment.
- Bring the baking soda bath to a boil in a wide pot.
- Divide dough into 8 equal pieces. Roll each into a long rope about 20 inches and form into a pretzel shape.
- Boil each pretzel in the baking soda bath for 30 seconds, then remove with a slotted spoon and place on a baking sheet.
- Bake for 10–12 minutes until deep golden brown.
- Brush immediately with melted butter while hot, then roll in the cinnamon sugar mixture.
How to Serve It
Serve these warm ideally within 10 minutes of coming out of the oven when they are at their softest and most irresistible. A small bowl of sweetened cream cheese dip (cream cheese beaten with a little honey and vanilla) on the side is an ideal pairing that kids love dragging each bite through. For a more classic version, skip the cinnamon sugar and finish with coarse salt instead for a savory pretzel that pairs beautifully with a cheese dipping sauce. Wrap any leftovers in foil and warm in a 300°F oven for 5 minutes the next day they come back to life remarkably well and taste almost as good as fresh.
7. Apple Nachos
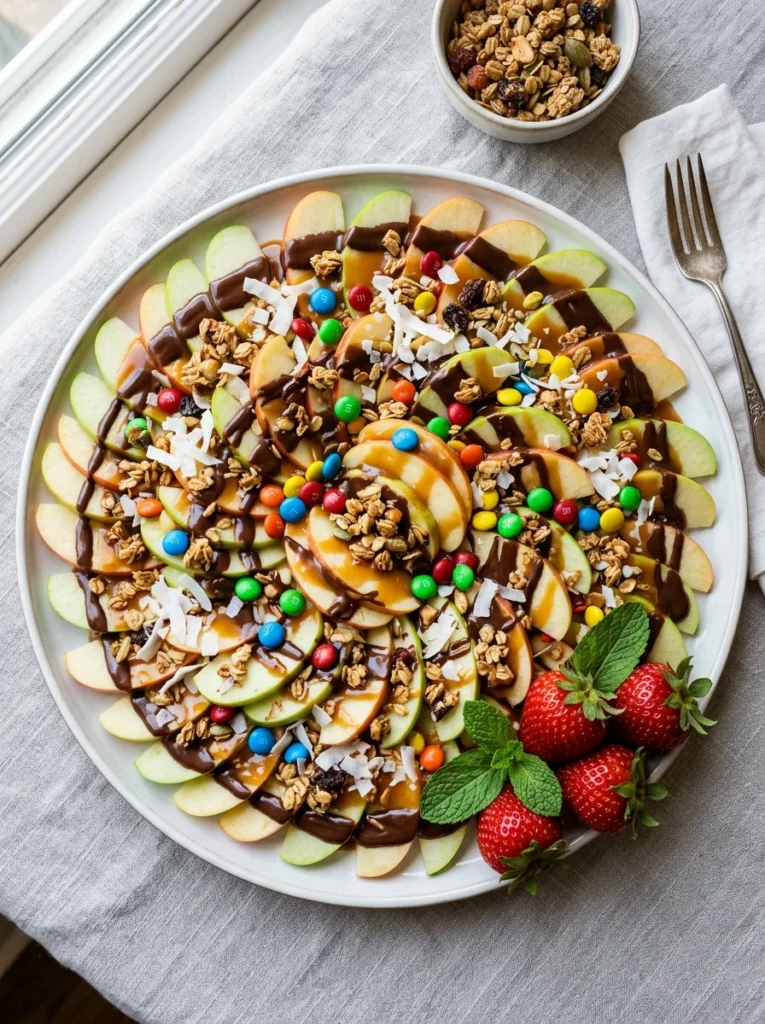
Apple nachos are one of those snack ideas that sounds too simple to be exciting but absolutely delivers the moment you set the platter down in front of a group of kids the concept of nachos made from fruit instead of chips is immediately interesting enough to capture attention, and the toppings are varied and colorful enough to make every single bite taste a little different from the last. Crisp apple slices form the base; they hold toppings beautifully and provide a sweet, juicy crunch that pairs perfectly with the richness of melted chocolate and caramel. The toppings are deliberately flexible: use whatever you have on hand from a short list of pantry and fridge staples, and the result always looks abundant and thoughtfully assembled even when it took you less than ten minutes from start to finish. This is also one of those rare snacks that kids genuinely want to help assemble, which makes it a fantastic after-school activity on days when you want to channel their energy productively.
Ingredients
- 3 large apples (Honeycrisp or Fuji), cored and thinly sliced
- Juice of ½ lemon (to prevent browning)
- 3 tablespoons dark chocolate chips, melted
- 3 tablespoons caramel sauce (store-bought is perfect)
- 2 tablespoons granola
- 2 tablespoons mini M&Ms or chocolate chips
- 2 tablespoons shredded coconut
- 1 tablespoon peanut butter, warmed until drizzleable
Instructions
- Slice apples thinly (about ¼ inch thick) and toss immediately with lemon juice to prevent browning.
- Fan apple slices across a large round plate or platter in overlapping layers, like traditional nachos.
- Melt dark chocolate chips in a microwave-safe bowl in 30-second intervals, stirring between each, until smooth.
- Drizzle melted chocolate over the apple slices in a back-and-forth motion.
- Drizzle caramel sauce in the opposite direction for a cross-hatch effect.
- Drizzle warmed peanut butter if using.
- Scatter granola, M&Ms, and shredded coconut evenly across the top.
- Serve immediately while the chocolate is still soft.
How to Serve It
Place this platter in the center of the table and let kids eat directly from it. The communal aspect makes it feel like a party and they absolutely love it. For a Halloween version, use orange-tinted white chocolate drizzle and black sprinkles for a seasonal presentation that requires zero extra effort. Swap M&Ms for seasonal candy (candy corn in fall, pastel sprinkles in spring) to keep the snack feeling fresh and event-specific throughout the year. A drizzle of tahini instead of peanut butter works beautifully for kids with peanut allergies and adds a subtle nutty depth that pairs wonderfully with the caramel.
8. Mini Caprese Skewers with Balsamic Drizzle
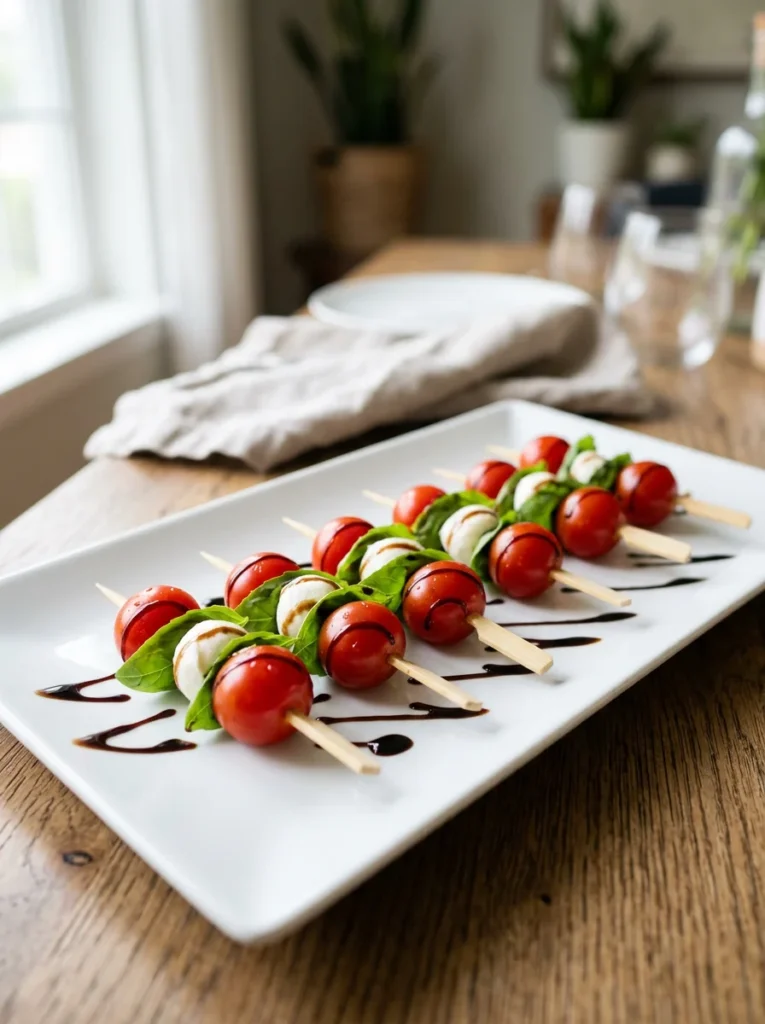
Mini Caprese skewers are proof that a snack does not have to be complicated to be genuinely good this is one of the simplest recipes on the entire list and also one of the most satisfying to eat, with the creamy mozzarella, sweet tomato, and fresh basil coming together in each bite the way they always have, because it is a combination that simply works every single time without fail. For kids who are ready to try something slightly more grown-up in flavor, these skewers introduce the brightness of fresh basil and the slight tang of balsamic in a format that is approachable and fun things on sticks are universally more appealing to children than the same ingredients arranged on a plate. Assembly takes about five minutes, requires zero cooking, and the result looks polished enough to serve to guests without feeling like a snack you threw together out of urgency. Make a big batch and they will disappear faster than you expect.
Ingredients
- 20 fresh mozzarella balls (ciliegine size)
- 20 cherry tomatoes
- 20 fresh basil leaves
- 3 tablespoons good-quality olive oil
- 2 tablespoons balsamic glaze
- Flaky sea salt and cracked black pepper
- 20 mini wooden skewers or toothpicks
Instructions
- Drain the mozzarella balls and pat gently dry with paper towels.
- Wash and dry the cherry tomatoes and basil leaves.
- Thread each skewer in this order: one basil leaf folded gently in half, one cherry tomato, one mozzarella ball.
- Arrange all completed skewers on a flat serving plate.
- Drizzle olive oil evenly over all the skewers.
- Drizzle balsamic glaze in a zigzag pattern across the entire plate.
- Finish with a pinch of flaky sea salt and a few grinds of black pepper.
- Serve within 30 minutes for the best flavor and freshness.
How to Serve It
Line these up in neat rows on a long slate or marble board for a presentation that looks genuinely beautiful and requires almost no effort beyond the assembly. For kids who find basil too strong, replace it with a small piece of fresh spinach or simply thread tomato and mozzarella alone; the balsamic drizzle still makes it feel complete. In summer, add a thin slice of peach between the tomato and mozzarella for a seasonal variation that introduces natural sweetness and makes the skewers taste even fresher. Keep a small pot of extra balsamic glaze for dipping kids always want more of it once they discover how good it tastes.
9. Peanut Butter Oat Energy Bites
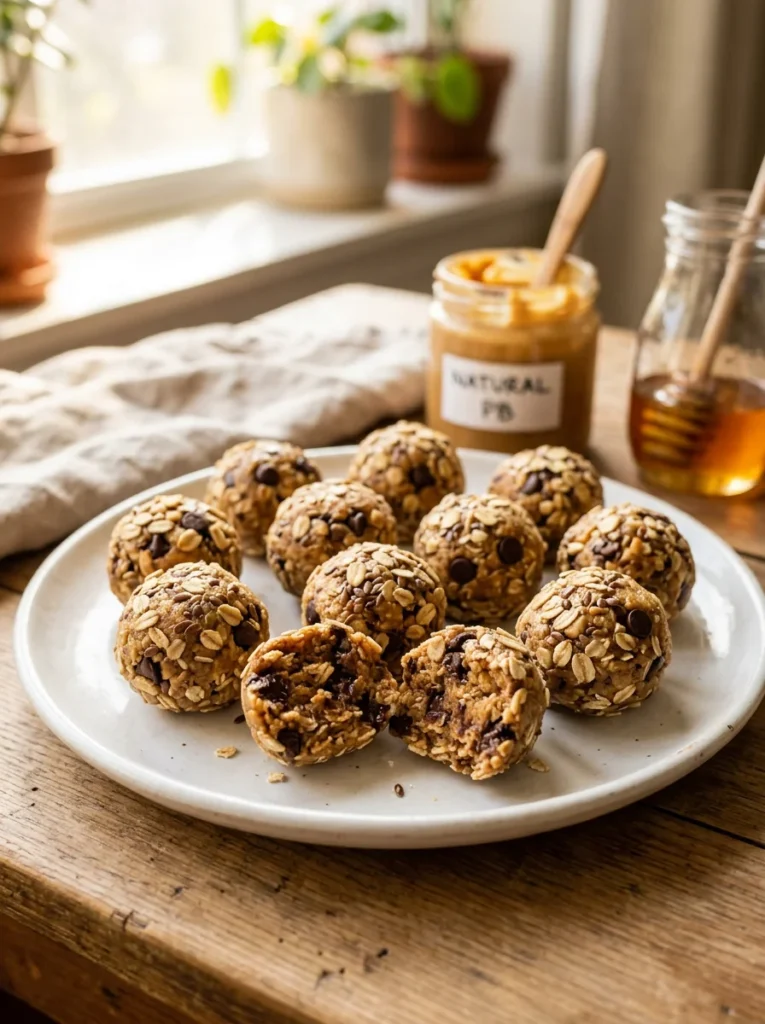
Peanut butter oat energy bites are the after-school snack that parents secretly love just as much as kids do they are dense, chewy, genuinely satisfying, packed with protein and fiber from the oats and peanut butter, and sweet enough from honey and chocolate chips to feel like a treat without crossing into dessert territory. The fact that they require zero baking makes them particularly appealing on busy afternoons when you want to offer something homemade without turning on the oven, and the refrigerator does all the work of firming them up while you help with homework or unload the dishwasher. Make a full batch on Sunday and keep them in an airtight container in the fridge all week. They are just as good on day five as they are fresh, which makes them one of the most practical snack recipes on this entire list. Kids who are old enough can roll these themselves, which turns snack prep into a brief, hands-on activity they actually enjoy.
Ingredients
- 1 cup rolled oats
- ½ cup creamy peanut butter
- ⅓ cup honey
- ½ cup mini chocolate chips
- 2 tablespoons ground flaxseed (optional)
- 1 teaspoon vanilla extract
- Pinch of salt
Instructions
- Combine all ingredients in a large mixing bowl and stir until everything is thoroughly combined.
- The mixture should be slightly sticky but holdable if it seems too wet, add 2 extra tablespoons of oats.
- Cover the bowl tightly with plastic wrap and refrigerate for 30 minutes. This makes rolling much easier.
- Scoop out about 1 tablespoon of mixture at a time and roll firmly between your palms into a smooth ball.
- Place each ball on a parchment-lined tray or plate.
- Refrigerate for at least 20 minutes before serving to firm up fully.
- Store in an airtight container in the refrigerator for up to one week, or freeze for up to two months.
How to Serve It
Roll the finished bites in shredded coconut, crushed graham crackers, or finely chopped roasted peanuts before refrigerating for a beautiful exterior coating and extra texture. Arrange a dozen on a small board alongside fresh apple slices for a complete after-school snack that covers sweetness, crunch, and protein in one spread. For a holiday version, roll in crushed candy cane pieces or add a dusting of festive sprinkles to the surface before chilling. Pack two or three in a small container for lunchboxes. They travel perfectly and hold their shape without making a mess.
10. Rainbow Veggie Pinwheels
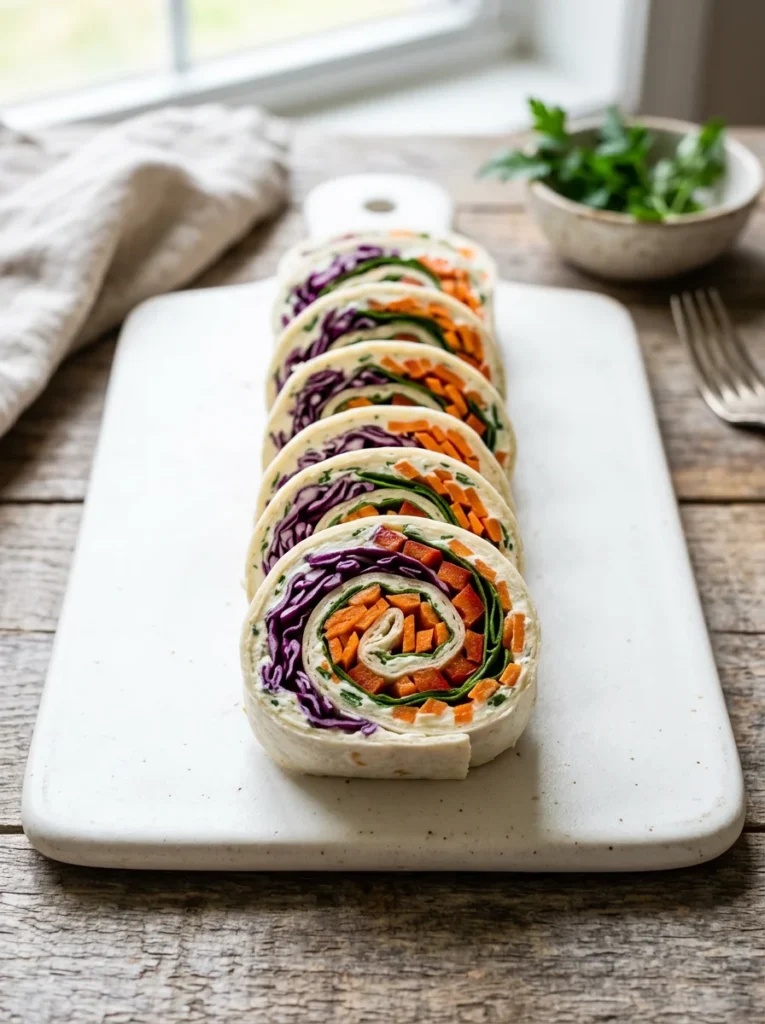
Rainbow veggie pinwheels are one of the most satisfying snacks to both make and eat. There is something genuinely pleasing about rolling up a tortilla packed with colorful ingredients and slicing it into those beautiful spiral rounds that immediately show off every layer of color inside. These pinwheels are cold, crisp, and refreshing, which makes them a perfect contrast to the warmer, oven-baked snacks on this list, and their hand-held, no-mess format makes them brilliantly practical for kids who want to eat at the counter between getting home and starting homework. The cream cheese acts as both the flavor base and the glue that keeps everything inside the tortilla when it is sliced, and the vegetables add real crunch and freshness that makes this snack taste vibrant rather than heavy. They work equally well as a lunchbox addition, a party snack, or a quick Saturday afternoon bite that comes together in under ten minutes flat.
Ingredients
- 2 large flour tortillas (10-inch)
- ½ cup whipped cream cheese
- ½ cup shredded purple cabbage
- ½ cup shredded carrot
- ½ cup fresh baby spinach leaves
- ½ cup red bell pepper, very thinly sliced
- 2 tablespoons fresh chives or green onion, finely chopped
- Salt and pepper to taste
Instructions
- Lay each tortilla flat on a clean surface.
- Spread cream cheese in a thin, even layer across the entire surface of each tortilla, all the way to the edges.
- Season lightly with salt and pepper.
- Layer spinach leaves across the cream cheese first as the base layer.
- Scatter shredded cabbage, carrot, and red bell pepper evenly across the tortilla.
- Sprinkle chives or green onion over the top.
- Roll the tortilla firmly and tightly from one end, keeping the filling compressed as you go.
- Wrap the roll tightly in plastic wrap and refrigerate for at least 30 minutes (this is important because it holds the shape for clean slicing).
- Slice into 1-inch rounds with a sharp knife and arrange cut-side up on a plate or board.
How to Serve It
Arrange pinwheel slices spiral-side up in a circular pattern on a round board for a presentation that looks almost too good to eat. The color spiral is genuinely stunning and guests and kids alike will comment on it before they even take a bite. Add a small bowl of ranch dressing or hummus in the center of the board for dipping, which kids will use enthusiastically and which makes the snack even more interactive. Swap the cream cheese for hummus or mashed avocado for a dairy-free version that tastes just as fresh and holds its shape equally well when refrigerated before slicing.
11. Homemade Soft Pretzel Bites with Cheese Sauce
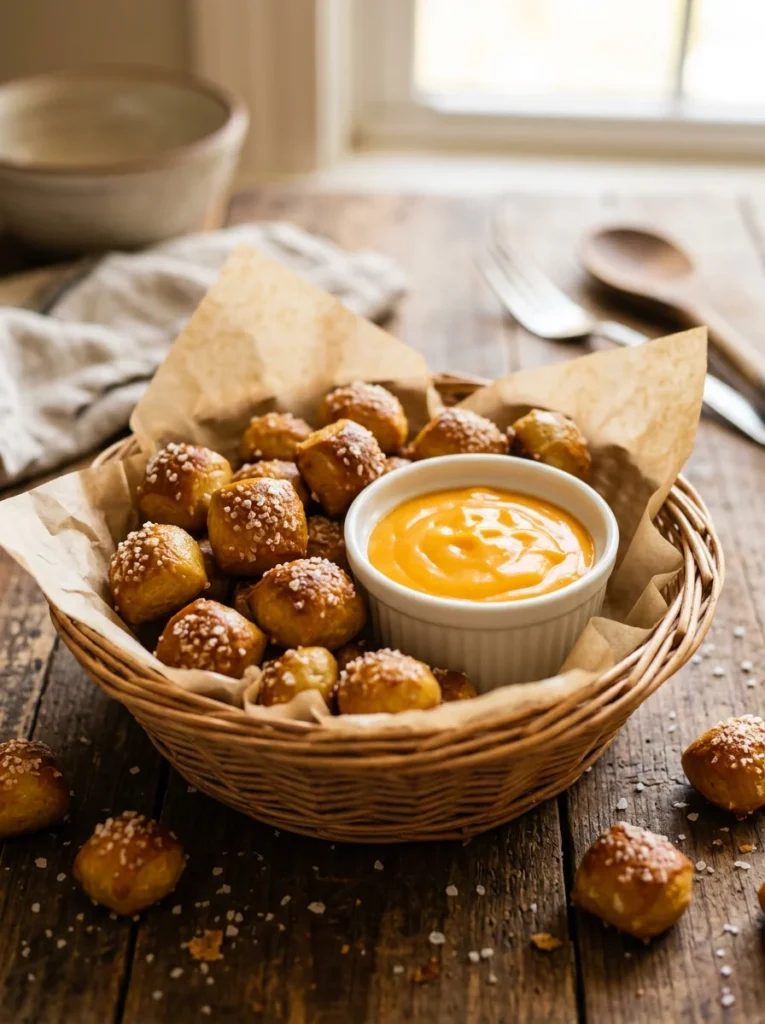
Soft pretzel bites are arguably one of the most crowd-pleasing after-school snacks in existence they are warm, chewy, slightly salty, and when paired with a thick, glossy cheddar dipping sauce, they become the kind of snack that kids will ask for by name from the moment they first try them. The bite-sized format is particularly well suited to after-school snacking because it is perfectly portioned for small hands and creates a natural dipping-and-eating rhythm that keeps kids happily occupied for a solid twenty minutes. This recipe uses the same base dough as the cinnamon sugar version earlier in this list, so if you are making both in the same week you can simply double the dough and finish half each way. The homemade cheddar sauce takes about five minutes and uses ingredients you almost certainly already have: cheddar, milk, butter, and a pinch of garlic powder and it is so far beyond anything from a can that there is genuinely no comparison.
Ingredients
- 1 batch soft pretzel dough (see recipe #6)
- Baking soda bath (see recipe #6)
- Coarse sea salt for topping
- For the cheddar sauce:
- 2 tablespoons butter
- 2 tablespoons all-purpose flour
- 1 cup whole milk
- 1½ cups sharp cheddar cheese, freshly grated
- ½ teaspoon garlic powder
- ¼ teaspoon mustard powder
- Salt and pepper to taste
Instructions
- Prepare pretzel dough and let rest 15 minutes as described in recipe #6.
- Preheat the oven to 450°F (230°C). Prepare a baking soda bath.
- Instead of forming pretzel shapes, roll dough into thick ropes and cut into 1-inch nuggets.
- Boil nuggets in the baking soda bath in batches for 30 seconds each, then remove with a slotted spoon.
- Place on parchment-lined baking sheets, sprinkle generously with coarse salt.
- Bake for 10–12 minutes until deep golden brown.
- For the cheese sauce: Melt butter in a small saucepan over medium heat. Whisk in flour and cook for 1 minute.
- Gradually whisk in milk until smooth. Cook, stirring constantly, for 3–4 minutes until thickened.
- Remove from heat and stir in cheddar, garlic powder, mustard powder, salt and pepper until completely smooth.
How to Serve It
Pour the warm cheese sauce into a wide, low ramekin and nestle it right in the middle of the pretzel bites pile so every piece is equidistant from the dip. Kids notice this kind of thoughtful setup and love it. For a fun serving idea, pile the pretzel bites into a small paper cone or basket lined with parchment for a street-food-style presentation that makes after-school snacking feel like an outing. Keep the cheese sauce warm in a small saucepan on the lowest heat setting and stir occasionally until it stays perfectly smooth and dippable for about 30 minutes after making.
12. Watermelon Pizza
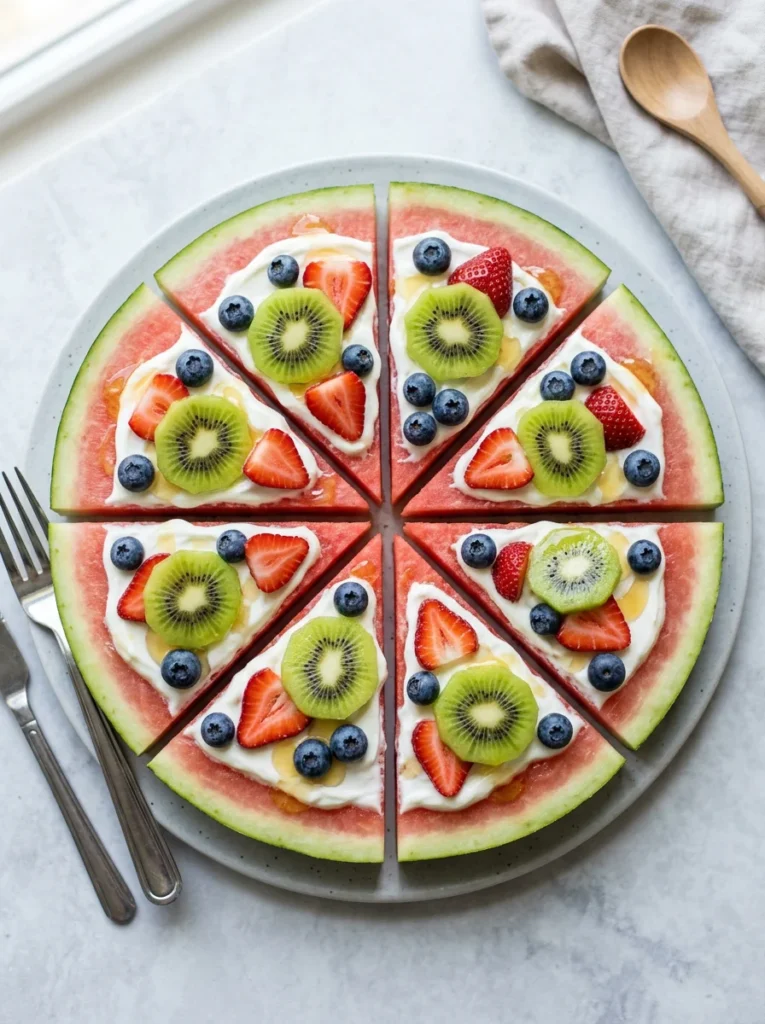
Watermelon pizza is the kind of snack idea that stops kids in their tracks the moment they see it a thick, round slice of watermelon layered with creamy yogurt and topped with colorful fresh fruit looks almost exactly like a real pizza, and the novelty of that presentation is genuinely enough to make children who normally resist fruit reach for a slice without hesitation. The watermelon base is naturally sweet, hydrating, and provides a crisp, juicy crunch that contrasts beautifully with the cool creaminess of Greek yogurt and the burst of flavor from ripe berries. There is no cooking involved whatsoever, the assembly takes about five minutes, and the result is visually stunning enough to be worth photographing before it disappears which it will, very quickly. This snack is at its absolute best in summer when watermelons are at peak sweetness and children are looking for something cool and refreshing after an afternoon outside.
Ingredients
- 1 large round slice of watermelon, about 1.5 inches thick (cut from the center of the melon)
- ½ cup full-fat Greek yogurt
- 1 tablespoon honey, plus more for drizzling
- ½ teaspoon vanilla extract
- ½ cup fresh blueberries
- ½ cup strawberries, sliced
- 2 kiwis, peeled and sliced into rounds
- 2 tablespoons shredded coconut (optional)
- Fresh mint leaves for garnish
Instructions
- Pat the watermelon slices dry on both sides with paper towels to remove surface moisture; this helps the yogurt adhere.
- Place the watermelon round on a large cutting board or flat serving plate.
- In a small bowl, stir together Greek yogurt, honey, and vanilla extract until smooth.
- Spread the yogurt mixture evenly over the entire surface of the watermelon round, leaving a small border around the edge (just like a real pizza crust).
- Arrange blueberries, strawberry slices, and kiwi rounds decoratively over the yogurt layer.
- Scatter shredded coconut over the top if using.
- Drizzle with extra honey in a thin zigzag pattern.
- Finish with a few fresh mint leaves.
- Cut into wedge slices and serve immediately.
How to Serve It
Carry this to the table whole before cutting so the kids get the full effect of the “pizza” presentation. The reactions are worth the extra moment of drama. Use a pizza cutter to slice it into wedges for the most authentic pizza-parallel experience, which kids find hilarious and love telling their friends about. For a birthday party or summer playdate, make multiple watermelon pizzas and set up a toppings station so kids can decorate their own individual slice before eating it. In winter months when watermelon is out of season, use thick slices of cantaloupe or a layer of honey-drizzled ricotta on a large rice cake as an alternative base that works surprisingly well.
13. Loaded Sweet Potato Toasts
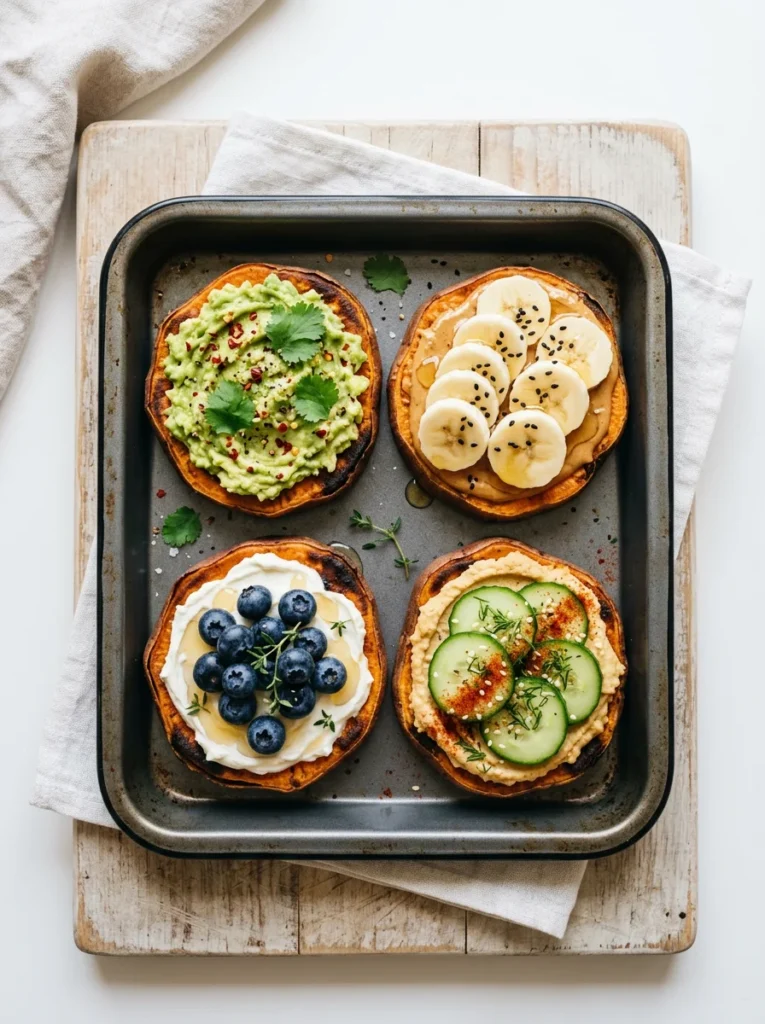
Sweet potato toast might sound unusual if you have never tried it, but once you do you will quickly understand why it has become one of the most popular alternative snack bases for kids and adults alike the sweet potato slices are roasted until tender and slightly caramelized at the edges, which gives them a depth of flavor and a natural sweetness that makes them genuinely delicious as a base for both savory and sweet toppings. Unlike bread toast, sweet potato provides real nutritional substance: fiber, vitamins A and C, and natural carbohydrates that give kids sustained energy rather than a quick spike and crash. The four topping variations in this recipe are just starting suggestions. Once kids discover that sweet potato toast can be topped like a regular piece of toast, they start coming up with their own combinations, which is exactly the kind of food curiosity you want to encourage at any age. These take about 25 minutes in the oven, most of which is hands-off time, making them very manageable for a weekday after-school snack.
Ingredients
- 2 large sweet potatoes, scrubbed clean
- 2 tablespoons olive oil
- Salt to taste
- Topping ideas:
- Mashed avocado + red chili flakes + lemon juice
- Peanut butter + banana slices + honey + cinnamon
- Cream cheese + fresh blueberries + honey drizzle
- Hummus + sliced cucumber + everything bagel seasoning
Instructions
- Preheat the oven to 400°F (200°C). Line a baking sheet with parchment paper.
- Slice sweet potatoes lengthwise into ¼-inch thick planks you should get 3–4 slices per potato.
- Brush both sides of each slice with olive oil and season lightly with salt.
- Arrange in a single layer on the prepared baking sheet.
- Roast for 15 minutes, then flip each slice carefully with a spatula.
- Roast for another 10–12 minutes until fork-tender and lightly golden at the edges.
- Remove from the oven and cool for 3 minutes before adding toppings.
- Add your chosen toppings and serve while the sweet potato is still warm.
How to Serve It
Set up a small “topping bar” when these come out of the oven, lay out small bowls of avocado mash, peanut butter, cream cheese, and hummus alongside various fruits and vegetables and let each child build their own version. This interactive approach makes the snack feel like a game and gives kids genuine ownership over what they eat, which almost always results in them eating more enthusiastically than if you handed them a pre-made plate. For a more formal after-school spread, plate each flavor variation separately on a wooden board and label them with small cards. Kids love having “options” presented to them as though they are at a restaurant. Store any untopped roasted sweet potato slices in the fridge for up to three days and reheat briefly in a toaster oven or air fryer for a fresh-from-the-oven result in under five minutes.
Conclusion
After-school snack time does not have to be a scramble through the pantry hoping something edible appears. With these thirteen recipes in your back pocket, you have a full rotation of fun, satisfying, genuinely kid-approved snacks that cover every mood from warm and cheesy to cool and fruity, from no-bake five-minute bites to oven-baked weekend projects that turn snack prep into a proper activity. Pick two or three favorites to try this week, let the kids get involved in making them, and watch how much more enthusiastically they eat something they had a hand in creating. Save this list somewhere you can find it again on a busy Tuesday, share it with a fellow parent who is always asking what to feed hungry after-school kids, and most of all enjoy snack time a little more than you did yesterday.
Leave a Reply